Get Tracey Cunningham’s Step-By-Step to Erasing Bands & Harsh Lines (Using 8 Formulas!)
If you’re dealing with a chair-hopping gray coverage client who has banding in their hair, we’ve tapped Schwarzkopf Professional® U.S. Creative Director of Color and Technique Tracey Cunningham (@traceycunningham1) to share how she successfully breaks through banding and achieves a seamlessly blended color in six easy steps
The Situation: A Complicated Hair History
BTC Editors spent an in-salon day with Tracey as her client shared she had seen multiple colorists since she touches up her grays every six weeks. Obviously, her hair history revealed inconsistent color application that had left behind multiple bands—each one telling a story of previous formulas that didn’t quite get it right.

Here’s an explanation of what caused each band:
- First, the color needed to be blended and balanced through the ends
- Then, it seemed as if the previous colorist had used a formula that was too dark, since the client had a high concentration of grays—causing a dark line of demarcation
- In her next appointment, about four months ago, a different colorist may have used a lighter shade due to complaints of a harsh line—leading to a formula that lacked neutral pigment and didn’t fully cover the grays
- Lastly, Tracey’s client had about an inch gray regrowth to be freshly covered
Click to read Tracey’s FULL consultation with tips on easing client concerns when using permanent color.
Breaking Through Bands: Tracey’s Step-By-Step With 8 Formulas
With a plan in place, Tracey strategically tackled the client’s uneven base using eight different formulas to seamlessly blend the bands while ensuring proper gray coverage.
Click the beaker to get Tracey’s formulas:

Step 1: To start this multi-process service, Tracey covers the gray regrowth first. Since her client had different concentrations of gray, combined with a hairline color that was too dark, Tracey utilized two formulas for this step. Apply Formula A to the hairline and Formula B to the base.
Tracey explains, “We need to formulate a lighter base around your hairline because the hair around your face grabs differently. So when I’m coloring, I always have a little hairline bowl and a base bowl. I can formulate two shades lighter and it will look the same—it’ll match. Everybody’s hair is a little different.”

Step 2: Once the base color is applied, Tracey allowed the hair to process fully before rinsing it.
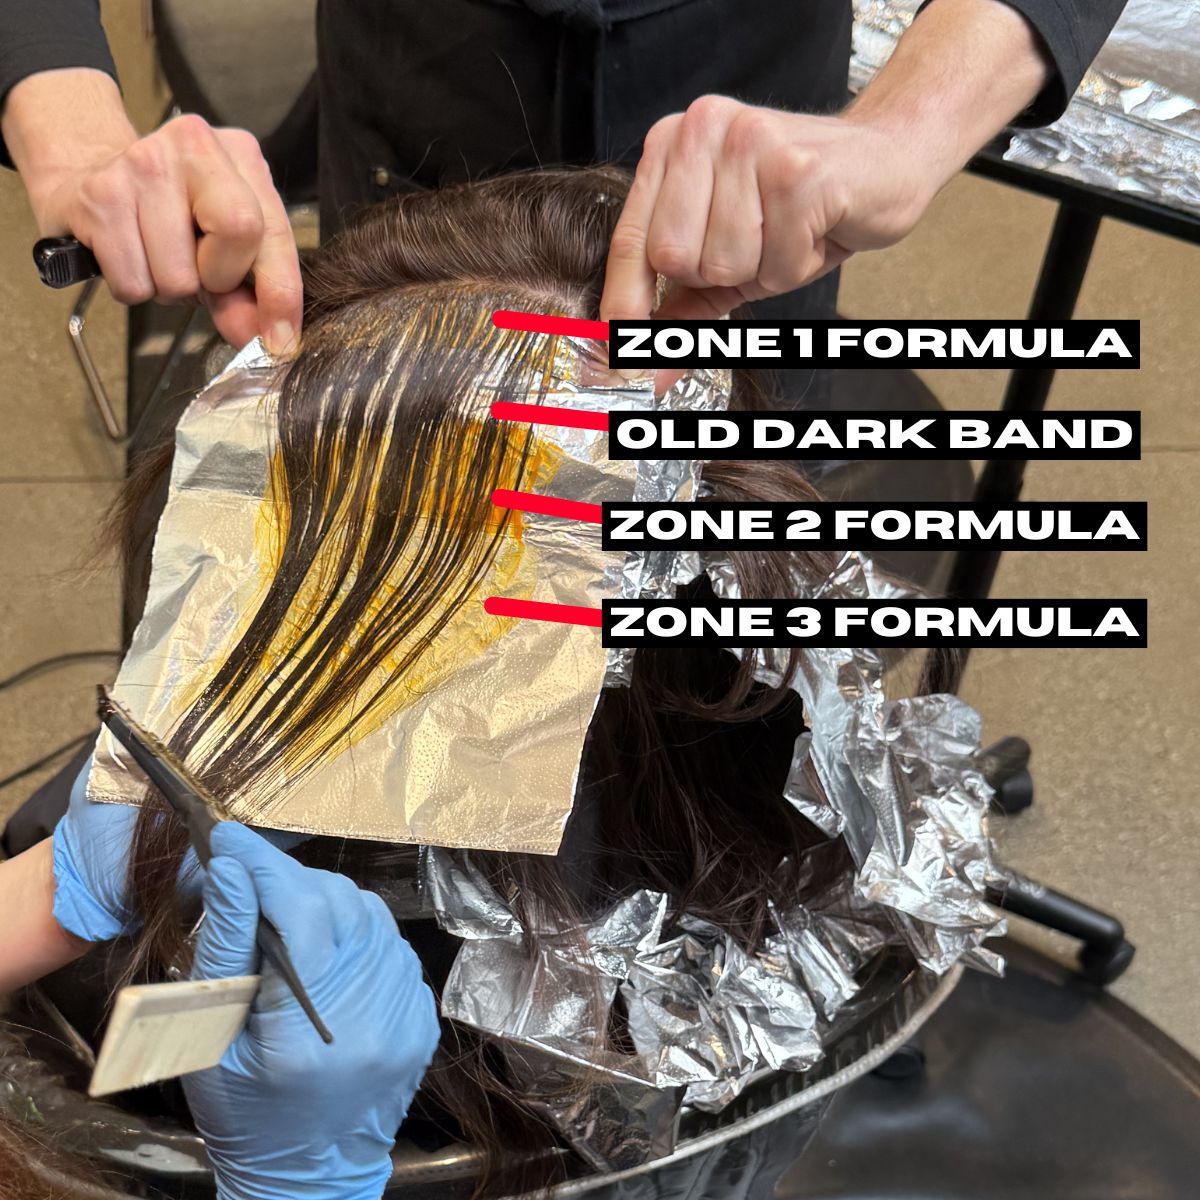
Step 3: For the next phase, Tracey preps four different bowls of color to strategically lift and blend the existing bands: The lightener, the Zone 1 toner, the Zone 2 toner and the Zone 3 toner.

Step 4: To highlight the hair, Tracey focuses on breaking up bands, especially around the hairline.
Pro Tip: “You don’t have to highlight the whole [head],” Tracey advises. “You want to know what your client needs and then you plan [where to highlight].”

Step 5: In between the highlights, Tracey applies lowlights in foils—and her technique requires careful application to avoid overlapping. Here’s how she applied each formula:
- Formula D: Apply to just the roots
- Skip the dark band
- Formula E: Use to break up the third band
- Formula F: Pull through the ends for seamless blending
See her lowlight roadmap below:

The finished foiling job:

Step 6: To complete the process, Tracey applied a root shadow to:
- Control excess warmth
- Enhance shine and vibrancy
- Add seamless dimension