- 1Step 1 of 8
Colour Selection 1
Roots to Ends: TIGI Colour Creative + TIGI Colour Activator 20 vol/6%Colour Selection 2
Roots to Ends: TIGI Colour Creative + TIGI Colour Activator 20 vol/6%Colour Selection 3
Mid-lengths to Ends: TIGI Colour Creative + TIGI Colour Activator 20 vol/6% - 2Step 2 of 8
Colour Selection 1
Roots to Ends: TIGI Colour Creative with
TIGI Colour Activator 20 vol/6%Colour Selection 2
Roots to Ends: TIGI Colour Creative with
TIGI Colour Activator 20 vol/6%Colour Selection 3
Mid-lengths to Ends: TIGI Colour Creative with
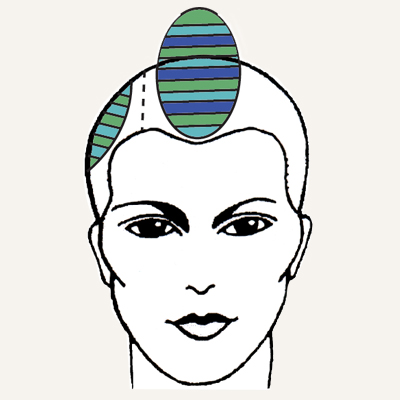
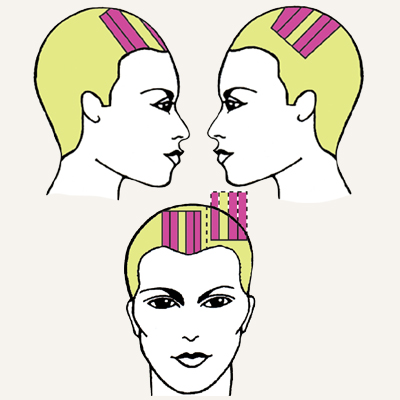
TIGI Colour Activator 20 vol/6%Step 1: Take a large oval parting on one side of the part and isolate.
Step 2: Take another oval section on the opposite side and isolate.
Step 3: Starting in the front hairline, take a horizontal placement weave and apply Colour Selection 1 and isolate with TIGI Colour Meche Strips.
Step 4: Second, take another horizontal placement weave and apply Colour Selection 2 and isolate.
Step 5: Third, continue working with the same weave, apply Colour Selection 3 and isolate.
Step 6: Continue working this pattern until the entire section is complete.
Step 7: For the back oval parting, start with Colour Selection 2 and alternate with Colour Selection 1 until the section is complete. - 3Step 3 of 8
Colour Selection 1
Roots to Ends: TIGI Colour Creative + TIGI Colour Activator 20 vol/6%Colour Selection 2
Roots: TIGI Colour Creative + TIGI Colour Activator 20 vol/6%
Mid-lengths to Ends: TIGI Colour True Light with
TIGI Colour Activator 8.5 vol/2.55% - 4Step 4 of 8
Colour Selection 1
Roots to Ends: TIGI Colour Creative + TIGI Colour Activator 20 vol/6%Colour Selection 2
Roots: TIGI Colour Creative + TIGI Colour Activator 20 vol/6%
Mid-lengths to Ends: TIGI Colour True Light with
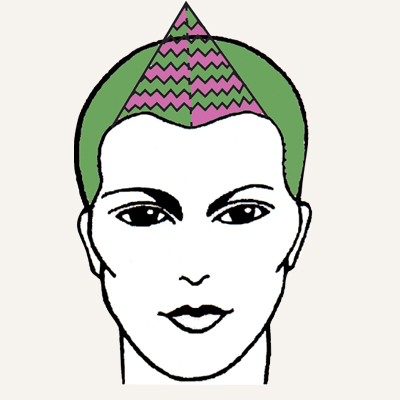
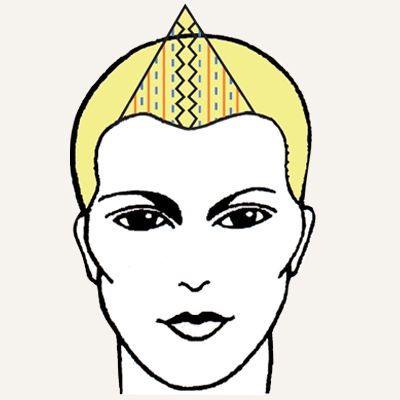
TIGI Colour Activator 8.5 vol/2.55%Step 1: Take a large triangle from mid-recession to the crown.
Step 2: For better control, subdivide the triangle into two sections using a profile parting.
Step 3: Block colour the remaining hair with Colour Selection 1 and isolate with TIGI Colour Meche Strips.
Step 4: Starting in the front hairline on one side of the triangle, take a zig-zag parting and apply Colour Selection 1 and isolate with TIGI Colour Meche Strips.
Step 5: For the second section, take another zig-zag parting and apply Colour Selection 2 and isolate with TIGI Colour Meche Strips.
Step 6: Continue working zig-zag partings alternating between Colour Selection 1 and Colour Selection 2 until the section is complete.
Step 7: For the opposite side, starting at the front hairline, take a zig-zag parting and apply Colour Selection 2 and isolate.
Step 8: For the next section, apply Colour Selection 1 and isolate.
Step 9: Continue working in the same manner alternating the two Colour Selections until the section is complete. - 5Step 5 of 8

Colour Selection 1
Roots to Ends: TIGI Colour Creative
with TIGI Colour Activator 20 vol/6%Colour Selection 2
Roots: TIGI Colour Creative with
TIGI Colour Activator 20 vol/6%
Mid-lengths to Ends: TIGI Colour Creative with
TIGI Colour Activator 20 vol/6% - 6Step 6 of 8
Colour Selection 1
Roots to Ends: TIGI Colour Creative
with TIGI Colour Activator 20 vol/6%Colour Selection 2
Roots: TIGI Colour Creative with
TIGI Colour Activator 20 vol/6%
Mid-lengths to Ends: TIGI Colour Creative with
TIGI Colour Activator 20 vol/6%Step 1: Take a rectangle shape on one side of the part incorporating the fringe area and isolate.
Step 2: Take another rectangle shape on the opposite side of the part near the crown area and isolate.
Step 3: Block colour the remaining with Colour Selection 1 and isolate with TIGI Colour Meche Strips.
Step 4: Working in the front rectangle area, work from the bottom to the top of the shape.
Step 5: For the first two slices, apply Colour Selection 2 and isolate with TIGI Colour Meche Strips.
Step 6: Next, take another slice and apply Colour Selection 1 and isolate with TIGI Colour Meche Strips.
Step 7: Continue with the same Colour Selection pattern
until the entire section is complete.
Step 8: For the opposite rectangle, work in the same manner starting from the bottom to the top of the shape. Alternate with two slices of Colour Selection 2 and one slice of Colour Selection 1. - 7Step 7 of 8
Colour Selection 1
Roots to Ends: TIGI Colour Creative
with TIGI Colour Activator 20 vol/6%Colour Selection 2
Roots to Mid-lengths: TIGI Colour Creative
with TIGI Colour Activator 20 vol/6%Colour Selection 3
Roots: TIGI Colour Creative with
TIGI Colour Activator 20 vol/6%
Mid-lengths to Ends: TIGI Colour True Light with
TIGI Colour Activator 8.5 vol/2.55% - 8Step 8 of 8
Colour Selection 1
Roots to Ends: TIGI Colour Creative
with TIGI Colour Activator 20 vol/6%Colour Selection 2
Roots to Mid-lengths: TIGI Colour Creative
with TIGI Colour Activator 20 vol/6%Colour Selection 3
Roots: TIGI Colour Creative with
TIGI Colour Activator 20 vol/6%
Mid-lengths to Ends: TIGI Colour True Light with
TIGI Colour Activator 8.5 vol/2.55%Step 1: Take a large triangle shape incorporating the fringe.
Step 2: Block colour the remaining hair with Colour Selection 1 and root shade the triangle section.
Step 3: Starting on one side of the triangle, take a horizontal slice and apply Colour Selection 2 and isolate.
Step 4: Next, take a natural weave and apply Colour Selection 3 and isolate.
Step 5: Continue working in the same manner until reaching the middle of the triangle shape.
Step 6: In the middle of the triangle, take a thicker zigzag shape and apply Colour Selection 1.
Step 7: For the opposite side, continue working in the same manner, until the section is complete.
Hair Color
TIGI Colour "Steels"
October 19, 2009·1 min read
Reach the brink of cool with these “Steel” step-by-steps from TIGI Colour. Cool things down into darkness or add dimension with the newest TIGI Colour shades. Give your clients the treasure of metallic beauty. Whether it’s an all-over colour or just an accent, the TIGI Colour Steel Collection has the perfect shades to give your client the deep, mystifying edge they’ve been looking for. (more…)
More to Read


