- 1Step 1 of 8
Colour Selection 1
Roots to Ends: TIGI Colour Creative with
TIGI Colour Activator 20 vol/6%Colour Selection 2
Roots: TIGI Colour Creative with
TIGI Colour Activator 20 vol/6%
Mid-lengths to Ends: TIGI Colour Creative with
TIGI Colour Activator 20 vol/6% - 2Step 2 of 8

Colour Selection 1
Roots to Ends: TIGI Colour Creative with
TIGI Colour Activator 20 vol/6%Colour Selection 2
Roots: TIGI Colour Creative with
TIGI Colour Activator 20 vol/6%
Mid-lengths to Ends: TIGI Colour Creative with
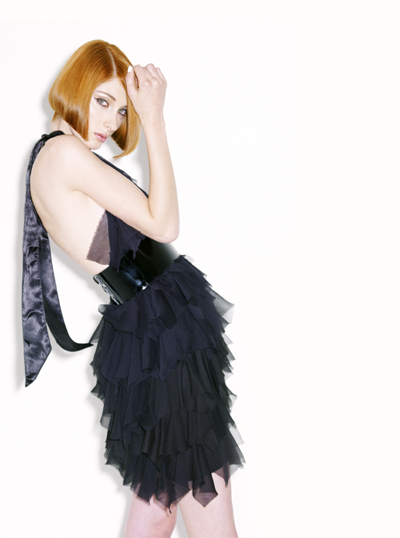
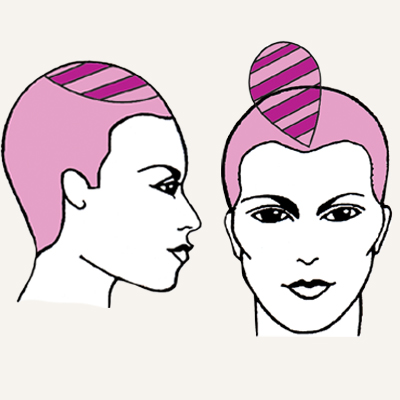
TIGI Colour Activator 20 vol/6%Step 1: Through one side of the natural part, take a curved section, incorporating one side of the hairline, to the ear and isolate.
Step 2: Block colour the remaining hair with Colour Selection 1.
Step 3: Starting in the front hairline, with a slicing technique, take a diagonal back parting, apply Colour Selection 1 and isolate with TIGI Colour Meche Strips.
Step 4: For the second section, take a diagonal back parting and apply Colour Selection 2 and isolate with TIGI Colour Meche Strips.
Step 5: Continue working diagonal back partings alternating between Colour Selection 1 and Colour Selection 2 until the section is complete. - 3Step 3 of 8
Colour Selection 1
Roots to Ends: TIGI Colour Creative with
TIGI Colour Activator 20 vol/6%Colour Selection 2
Roots: TIGI Colour Creative with
TIGI Colour Activator 20 vol/6%
Mid-lengths to Ends: TIGI Colour Creative plus
12 inches (30cm) TIGI Colour Mix Master with
TIGI Colour Activator 20 vol/6% - 4Step 4 of 8
Colour Selection 1
Roots to Ends: TIGI Colour Creative with
TIGI Colour Activator 20 vol/6%Colour Selection 2
Roots: TIGI Colour Creative with
TIGI Colour Activator 20 vol/6%
Mid-lengths to Ends: TIGI Colour Creative plus
12 inches (30cm) TIGI Colour Mix Master with
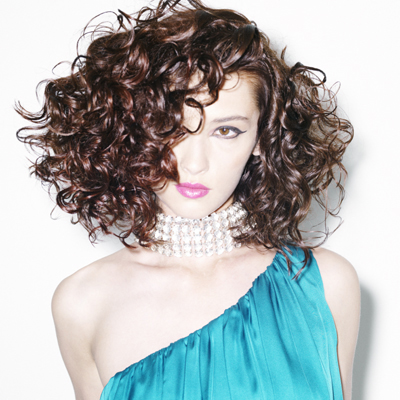
TIGI Colour Activator 20 vol/6%Step 1: Take an off-set horse-shoe parting and isolate.
Step 2: Block colour the remaining hair with Colour
Selection 1 and isolate with TIGI Colour Meche Strips.
Step 3: In the horse-shoe parting, starting in the crown area, take a diagonal forward slice.
Step 4: Within the diagonal forward slice, take a natural weave and clip away.
Step 5: Apply Colour Selection 1 to the diagonal forward slice and isolate with TIGI Colour Meche Strips.
Step 6: For the natural weave, release the section and apply
Colour Selection 2 and isolate with TIGI Colour Meche Strips.
Step 7: Take another slice and continue working the same manner until reaching the front hairline.
Step 8: On the opposite side of the horse-shoe, starting in the crown area, take diagonal parting to create a “V” section with the diagonal forward line.
Step 9: Continue working in the same manner as the previous side.
Step 10: Apply Colour Selection 1 to the diagonal slice parting and Colour Selection 2 to the natural weave.
Step 11: Continue working to create “V” sections within the horse-shoe parting, until the section is complete. - 5Step 5 of 8
Colour Selection 1
Roots to Ends: TIGI Colour Creative with
TIGI Colour Activator 20 vol/6%Colour Selection 2
Roots: TIGI Colour Creative with
TIGI Colour Activator 20 vol/6%
Mid-lengths to Ends: TIGI Colour Creative plus
12 inches (30cm) TIGI Colour Mix Master with
TIGI Colour Activator 20 vol/6% - 6Step 6 of 8
Colour Selection 1
Roots to Ends: TIGI Colour Creative with
TIGI Colour Activator 20 vol/6%Colour Selection 2
Roots: TIGI Colour Creative with
TIGI Colour Activator 20 vol/6%
Mid-lengths to Ends: TIGI Colour Creative plus
12 inches (30cm) TIGI Colour Mix Master with
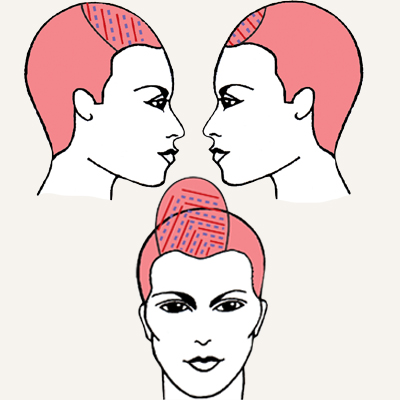
TIGI Colour Activator 20 vol/6%Step 1: Take an off-set tear drop section from the top area of the headshape and isolate.
Step 2: Block colour the remaining hair with Colour Selection 1.
Step 3: In the tear drop section, working from the front to the back, take diagonal back slices and apply Colour Selection 1 and isolate with TIGI Colour Meche Strips.
Step 4: For the next section, take another diagonal back slice and apply Colour Selection 2 and isolate with TIGI Colour Meche Strips.
Step 5: Continue working diagonal back partings alternating Colour Selection 1 and Colour Selection 2 until the section is complete. - 7Step 7 of 8
Colour Selection 1
Roots to Ends: TIGI Colour Creative with
TIGI Colour Activator 20 vol/6%Colour Selection 2
Roots: TIGI Colour Creative with
TIGI Colour Activator 20 vol/6%
Mid-lengths to Ends: TIGI Colour Creative with
TIGI Colour Activator 30 vol/9%Colour Selection 3
Roots: TIGI Colour Creative with
TIGI Colour Activator 20 vol/6%
Mid-lengths to Ends: TIGI Colour Creative
plus 3 inches (7.5cm) TIGI Colour Mix Master
and 3 inches (7.5cm) TIGI Colour Mix Master
with TIGI Colour Activator 20 vol/6% - 8Step 8 of 8
Colour Selection 1
Roots to Ends: TIGI Colour Creative with
TIGI Colour Activator 20 vol/6%Colour Selection 2
Roots: TIGI Colour Creative with
TIGI Colour Activator 20 vol/6%
Mid-lengths to Ends: TIGI Colour Creative with
TIGI Colour Activator 30 vol/9%Colour Selection 3
Roots: TIGI Colour Creative with
TIGI Colour Activator 20 vol/6%
Mid-lengths to Ends: TIGI Colour Creative
plus 3 inches (7.5cm) TIGI Colour Mix Master
and 3 inches (7.5cm) TIGI Colour Mix Master
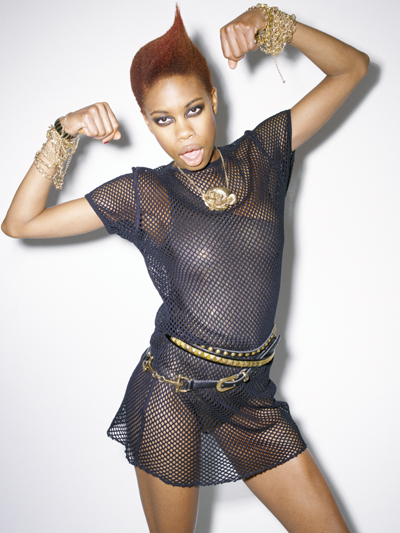
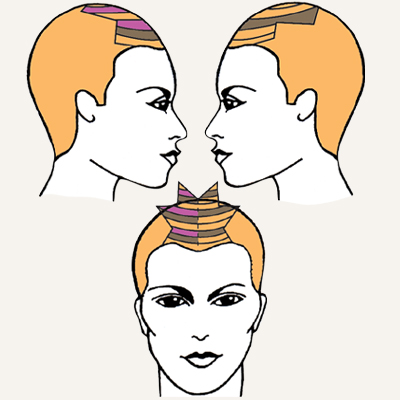
with TIGI Colour Activator 20 vol/6%Step 1: Take out an irregular zig-zag section through the top area incorporating the natural part and crown area.
Step 2: Block colour the remaining hair with Colour Selection 1 and isolate with TIGI Colour Meche Strips.
Step 3: In the zig-zag section, subdivide for better control.
Step 4: Starting in the front hairline, take curved parting and apply Colour Selection 1 to both sides of the part and isolate with TIGI Colour MecheStrips.
Step 5: For the second parting, apply Colour Selection 2 to one side of the part and Colour Selection 1 to the other side.
Step 6: For the third parting, apply Colour Selection 3 to one side of the part and Colour Selection 2 to the other side.
Step 7: Continue working in this order until the entire section is complete.
Hair Color
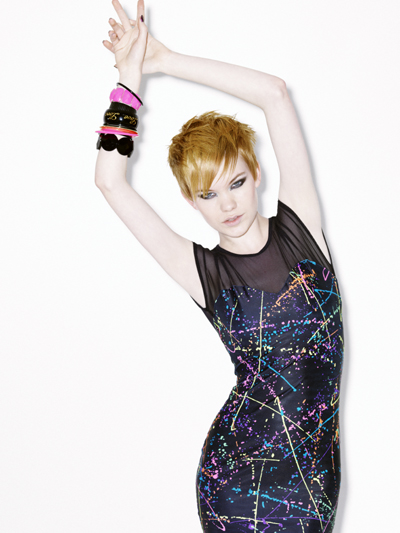
TIGI Colour "Redsandcoppers" Step-By-Steps
October 15, 2009·1 min read
Whether it’s a soft crimson or a playful strawberry blonde and anywhere in-between, TIGI Colour has just what you need to suit any kind of redhead. Get vibrancy at any level. Amp it up to a true, vivacious copper or tone it down with a subtle, barely there red hue. Here, learn how recreate four stunning reds, from the TIGI Colour Reds&Coppers Collection. Click Now to view FREE step-by-step videos from every look! View the Collection: Reds&Coppers and Steels View the Step-by-Step: Steels Get TIGI PRO Tools:TIGI Pro Neck ShieldTIGI Pro Sectioning ClipsTIGI Pro Trimmer (more…)
More to Read


