- 1Step 1 of 15
Hair
Apply label.m Volume Mousse through damp, sectioned hair from roots to ends. Blow-dry the mousse into the hair until completely dry. - 2Step 2 of 15
Create a halo section, leaving at least 2½ inches around the hairline.
- 3Step 3 of 15
Crimp the roots throughout the internal halo section, about 3 inches up from the scalp for mega-root lift.
- 4Step 4 of 15
Use a large barrel curling iron or tongs to curl the ends of the crimped roots.
- 5Step 5 of 15
Curl the remaining hair in the hairline section from roots to ends.
- 6Step 6 of 15
Gently brush through from roots to ends, focusing on the crimped roots for explosive volume.
- 7Step 7 of 15
Backcomb the internal crimped roots to create lift for the bubble shape. Brush the hairline section back over the center section for a smooth surface.
- 8Step 8 of 15
Pin to create the desired shapes and finish with label.m Hairspray and label.m Shine Mist for hold and shine.
- 9Step 9 of 15
Gently release random strands for the ghostly, “destroyed” effect.
- 10Step 10 of 15
Makeup
Mix MAC Studio Face and Body Foundation and MAC Strobe Cream Illuminator and apply to the skin with a MAC Duo Fibre Face Brush. - 11Step 11 of 15
Using a Make Up Store Eye Pencil in Black Matte, sketch in the main cranial outlines—temples, eye sockets, cheekbones, teeth, chin and neck. Use a real skull for reference, and work with the face shape when drawing the design.
- 12Step 12 of 15
Using the same black pencil, line the top and bottom waterlines, fill in the entire eyelid up to the brow, then blend and intensify with a MAC 117 Blending Brushand Make Up For Ever Eye Shadow in Black Matte. Dab MAC Gloss Coatin Clear over the top to create shine on the eyelid.
- 13Step 13 of 15
Choose various sections of the design to add a gradient for extra depth—especially the nose. Use the kohl pencil to color and blend with the MAC 117 Blending Brush and black eye shadow to intensify, set and blend the edges.
- 14Step 14 of 15
Highlight parts of the skull next to the black outlines with Make Up Store Eye Pencil in White Matte to create contrast and 9dimension. Use a small eye shadow brush to smudge out the white pencil and press Make Up For Ever Eye Shadow in White Matte over the top to intensify and blend. (You can go over these highlighted sections with a reflective white pigment for a more luminous effect).
- 15Step 15 of 15
*tip: For a more realistic effect, work from a reference, keep your lines random—not straight—and allow areas of the natural skin to shine through.
BTC Hair Trend Report
How-To: Sexy Día De Los Muertos Hair and Makeup
October 13, 2015·1 min read
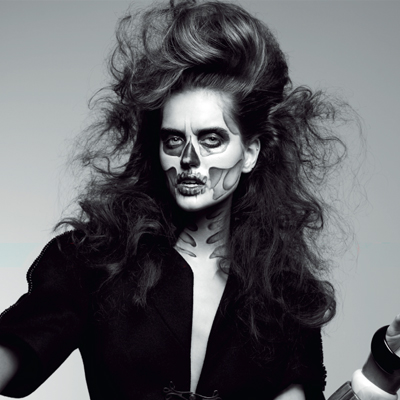
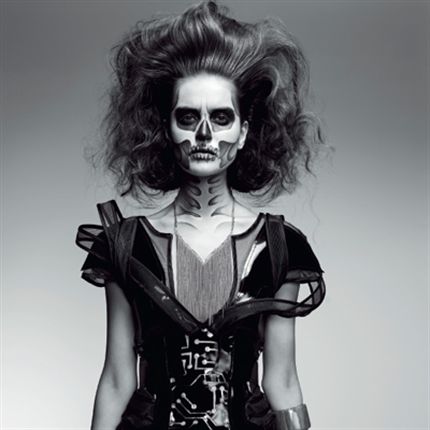
Enter BTC’s Halloween contest for a chance to win a $100 gift certificate to the BTC store! Hashtag your best looks to #behindthechair and your work could be featured! Here’s a fresh take on the popular Day of the Dead costume, created by label.m’s International Artistic Director, Richard Mannah (a BTC Big Shot finalist) and Makeup Artist Chereine Waddell. Who says the living dead can’t be sexy and romantic? (more…)
More to Read


