- 1Step 1 of 7
Apply Formula A to whole head to achieve a smokey, yet golden brown base.
- 2Step 2 of 7
Working from the back toward the face, apply balayage using classic hand and brush technique.
- 3Step 3 of 7
Where shadow color is present, apply Formula B from mid-shaft to ends, creating a gradient effect.
- 4Step 4 of 7
Lighten using Formula C. Remember: for balayage and hair painting, the consistency of your lightener should be thick—think toothpaste consistency. That way, it adheres to the hair without dripping.
- 5Step 5 of 7
Once application is complete, drape saran wrap over the head and enclose the colored hair within to retain heat. Process for about 40 minutes.
- 6Step 6 of 7
Shampoo and treat with Wella Blondor Seal & Care Post-Lightening Treatment for five minutes.
- 7Step 7 of 7
Apply Formula D and let process for a minimum of 10 minutes.
Balayage
How-To: Open Air Balayage
June 18, 2014·1 min read
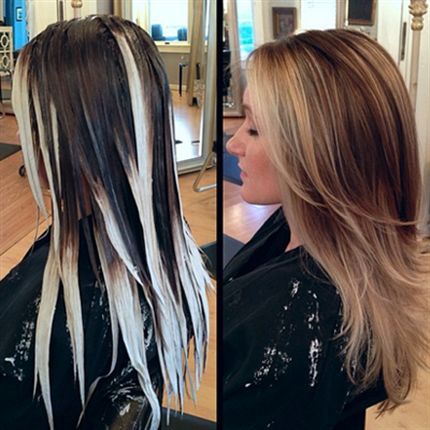
Chelsea Caruso, a.k.a. @chelscaruso of Gerber Salon in Keyport, NJ, is no newcomer to balayage’s sister technique of hair painting. So when a client who wanted to change up her color—but wasn’t committed to frequent maintenance—came into her salon, she knew exactly what to do! This look is bold around the face, but soft throughout the rest of the head and lends itself to growing out beautifully. Check out Chelsea’s color formula and tips below! Helpful Tips to Keep In Mind: Remind your client that investing in her hair means investing in quality products. Using a color-supported shampoo and (more…)
More to Read


