- 1Step 1 of 12
Prep the nails. CND® recommends using the P.E.P. Technique to ensure CND® SHELLAC® adheres properly to the natural nail plate. P.E.P. stands for Perform a Manicure, Eliminate Surface Contaminants and Purify Nail Plate Layers.
- 2Step 2 of 12
Apply a thin layer of SHELLAC™ Base Coat. Cure for 10 seconds in the CND® LED Lamp.
- 3Step 3 of 12
Apply a thin layer of SHELLAC™ Cashmere Wrap. Cure for 1 minute.
- 4Step 4 of 12
Dispense a small amount of SHELLAC™ Winter Nights, Radiant Chill, Mystic Slate and Cashmere Wrap into a mixing tray.
- 5Step 5 of 12
Create hexagon shapes with a detail brush, starting in the top right corner with SHELLAC™ Radiant Chill. Cure for 1 minute.
- 6Step 6 of 12
Repeat with SHELLAC™ Winter Nights, Cashmere Wrap and Mystic slate, staggering the colors down the nail in alternating hexagon shapes. Cure each layer for 1 minute.
- 7Step 7 of 12
Use a flat edge brush and SHELLAC™ Black Pool to line the lower edge of each hexagon, feathering outward to create shaded dimension.
- 8Step 8 of 12
Repeat this process with SHELLAC™ Cream Puff along the inner edges of the hexagons, feathering inward. To help blend the color, use a small amount of 99% Isopropyl Alcohol as needed. Cure for 1 minute.
- 9Step 9 of 12
Apply a thin layer of SHELLAC™ Top Coat. Cure for 1 minute.
- 10Step 10 of 12
Wipe with 99% Isopropyl Alcohol to remove top film
- 11Step 11 of 12

Finished Look
- 12Step 12 of 12Watch the video ↗
Nails
Muted Mosaic Nail Art
October 5, 2017·1 min read
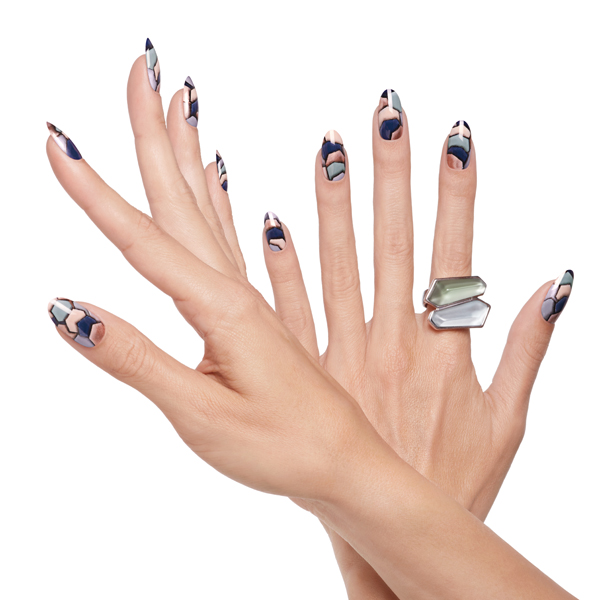
Geometric-inspired designs will make your client feel like a walking piece of art. They’re totally original, super-cool and we love this mosaic nail design using CND’s® new Glacial Illusion Collection. Get all the steps and watch the full video how-to! (more…)
More to Read


