- 1Step 1 of 14
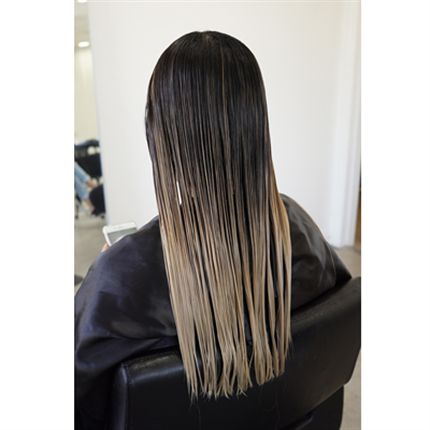
Section the hair into five quadrants—two quadrants in the back and three in the front. Mindy separates the front quadrants into a Mohawk section and two sections on the sides.
- 2Step 2 of 14
Apply Formula A using an ombré technique and foils. For this step, Mindy follows this pattern:
- Highlight starting at the nape, then tease a thin section.
- Weave, pretty evenly, and clip the top part away. Paint a little more than half of the bottom weave, creating your lowlight.
- Next, unclip the top weave and paint that up to the tease, creating your highlight.
- For the next section, weave highlights and paint a few centimeters away from the scalp all the way down.
- Continue this pattern for every quadrant.
- 3Step 3 of 14
After Formula A is applied, cover the head with Saran Wrap to help with insulation. Process for 30 minutes.
- 4Step 4 of 14
After 30 minutes, check the first foil to see if the hair lifted to a Level 9. If not, continue processing and check again in 15-minute intervals. “If you see that parts are darker or not as saturated, go through each foil and saturate it again,” advises Mindy.
- 5Step 5 of 14
If some parts of the hair reach a Level 9 while other parts are not ready, take any Level 9 pieces out of the foil and wipe the lightener off with a towel. Continue this process as needed.
- 6Step 6 of 14
When the entire head reaches a Level 8/9, rinse using Fanola Fiber Fix n3 Finalizing Fiber Shampoo. Shampoo twice to ensure the hair is clean and contains no remnants of the bleach.
- 7Step 7 of 14
After rinsing out the shampoo, squeeze out the excess water, then use Fiber Fix Step 2 and run it through the hair.
- 8Step 8 of 14
Section the hair into four quadrants to prepare for toning.
- 9Step 9 of 14
Apply Formula D to the ends, starting in the front and making your way toward the back. “I find that using a YS Park comb is the easiest and makes the process faster for me,” says Mindy.
- 10Step 10 of 14
Next, apply Formula B to the roots. (Mindy diluted Formula B with water to make sure her client’s hair did not lift any further.) Then, apply Formula C to the midlengths.
- 11Step 11 of 14
Proceed to cross-check and make sure everything is saturated. If you notice that some parts are not taking in the color, you can drag Formula C a bit lower or mix it with Formula D and apply. Let the toner process for about 15 minutes.
- 12Step 12 of 14

Rinse out the color, then apply Fanola Fiber Fix Step 2 as a mask. Leave it on for about 5 minutes then rinse it out and towel-dry.
- 13Step 13 of 14
Use a quarter-sized amount of Neuma Smoothing Creme + 2 pumps of Neuma Argan Oil and towel-dry once again, then blow-dry.
- 14Step 14 of 14
For styling, you can leave her hair straight or use the T3 Bodywaver 1¾-inch Styling Iron to curl it. Use hairspray to hold the curls.
Creative Color
How-To: Metallic Purple Ombré
April 10, 2017·1 min read
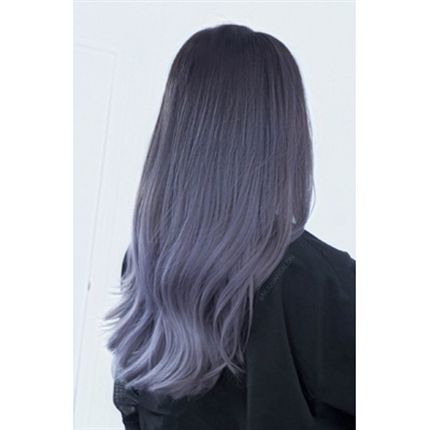
Looking for a way to make your fashion colors a little more wearable for all clients? Check out this metallic purple ombré from Mindy Nam (@mindy.n), a stylist at Miju Van Salon in Beverly Grove, Calif. Metallics are seriously on-trend right now and we can almost guarantee she’ll love this take on it. Get the color formulas and steps below. Pricing Full ombré/highlights: $250 to $350+ (more…)
More to Read


